How to Prevent Grounds in Your Coffee (Any Coffee Maker)
If you’re experiencing ground coffee sediment at the bottom of your cup of coffee, then the good news is that it’s usually down to user error and you can easily prevent grounds in your coffee.
In order to stop coffee grounds in your coffee, use a coarser grind, use less coffee, ensure that paper filters are wetted so that they stick to the sides of the holder, and avoid tamping the coffee unless you’re preparing espresso. Make sure that your equipment is always thoroughly cleaned to remove lodged coffee grounds.
For those that grind their own coffee, I’ll also discuss how poor-quality coffee grinders can contribute to the problem. Let’s now take a closer look at a range of coffee makers to help you remedy the problem.
Drip coffee makers
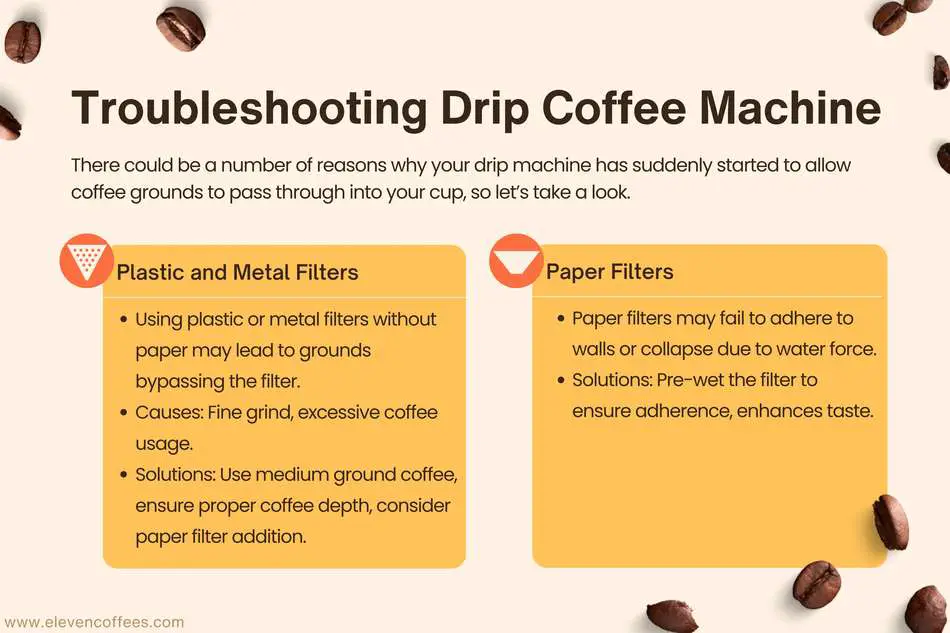
There could be a number of reasons why your drip machine has suddenly started to allow coffee grounds to pass through into your cup, so let’s take a look.
Plastic and metal filters

If you’re using a plastic or metal filter without paper, likely that some grounds may bypass the filter. However, the amount of sediment shouldn’t be so great that it makes drinking the coffee unpleasant.
Using too fine a grind could be one reason that you’re experiencing a large quantity of sediment in your cup, because the holes in the filter screen are larger than the finely ground coffee.
If the coffee is very finely ground (such as that used for espresso coffee), the coffee may also form one dense lump that results in a build-up of water that pools and overflows. The overflowing water will contain coffee grounds that end up in your carafe.
Exacerbating the problem further might be the fact that you’re using too much coffee for the size of your filter, again allowing a build-up of water that can overflow.
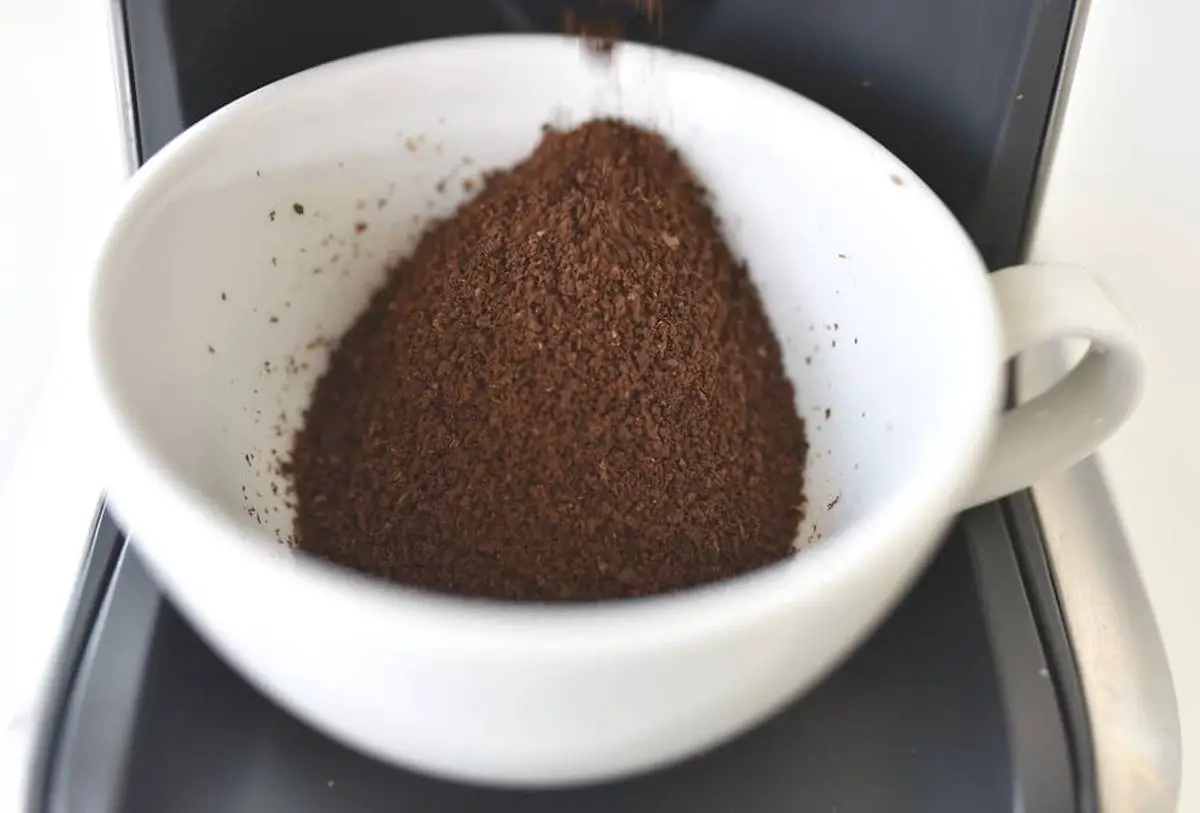
Look for coffee that has been specially ground for use in drip coffee makers like this medium ground coffee. If you’re grinding your own coffee beans, use a medium grind setting on your grinder.
To ensure that you have the right amount of coffee for your brewer, the depth of the coffee inside the filter should measure approximately three to five centimetres.
A very small amount of grinds is normal from plastic or metal filters, so add a paper filter if you want your coffee to be totally sediment-free. Check with your coffee machine manufacturer for the size of paper filter you need.
For a coffee maker that produces the cleanest coffee out there through its ultra-thick paper filters, look no further than the iconic Chemex.
Paper filters
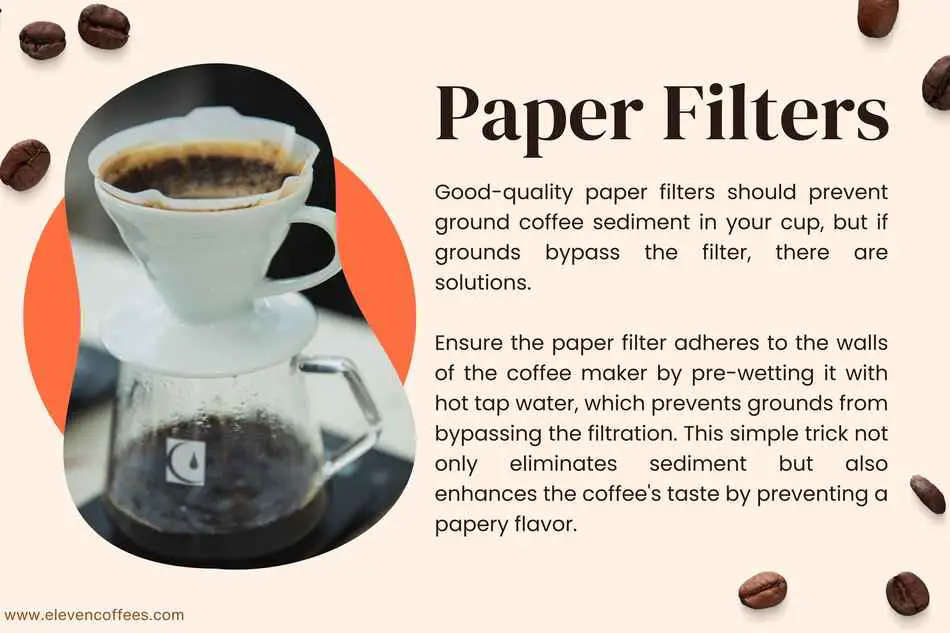
If you’re using good-quality paper filters, you shouldn’t experience any ground coffee sediment in your cup. Fortunately, the fix is usually quite straightforward if grounds are bypassing the paper filter.
You’ve probably noticed that when you add a paper filter to your coffee maker, it doesn’t adhere to the walls.
Using too fine a grind and/or too much coffee will cause a build-up of water that overflows into the gap between the paper filter and the filter basket.
This causes a real lot of ground of coffee to bypass as there’s absolutely no filtration from the filter basket, resulting in a very muddy cup of coffee.
Another issue with paper filters is that the force of the water hitting the paper filter may cause it to collapse, again allowing the coffee and water to overflow.
The trick is to pre-wet the filter inside the basket with water from your hot tap. This ensures that the paper sticks to the sides of the basket, totally eliminating the possibility of ground coffee bypassing the paper filter.
The great news is that this trick also improves the taste of your coffee as an unrinsed filter imparts a papery taste to your coffee. Don’t believe me? Try soaking a paper filter in water for five minutes and give the water a taste.
For a full tutorial on how to make drip coffee using the correct technique, I recommend that you watch this short video.
Moka pot
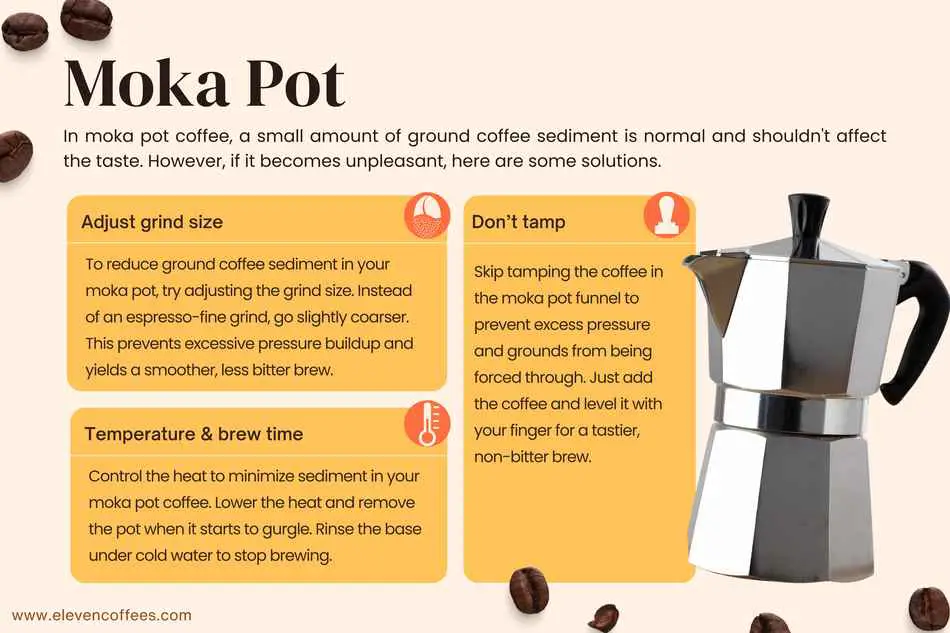
Whilst a very small amount of ground coffee sediment may find itself into a cup of moka pot coffee, the amount shouldn’t be so great that it makes drinking the coffee unpleasant. If this is the case, here are some fixes.
Adjust grind size
You’ll find a lot of brewing guides calling for a very fine, espresso-like grind size for the moka pot. Whilst it’s true that you do want a fine grind, it shouldn’t be espresso-fine, so try coarsening the grind a little.
Due to the build-up of pressure inside a moka pot, using too fine a grind allows the water to force a certain amount of the ground coffee through the filter pores.
The other great news about using a slightly coarser grind is that the coffee will have a more delicate taste that’s still very strong but isn’t harsh or bitter.
Don’t tamp
Again, there’s a belief that tamping (pushing down) the coffee inside the funnel is the correct method.
Doing so only results in greater pressure that forces through ground coffee. To prevent this issue, all you need to do is add the coffee to the funnel and level off with your finger.
You’ll also experience a tastier cup as the decreased steam pressure doesn’t scold the coffee, turning it bitter.
Temperature and brew time
Another way to decrease the amount of sediment inside a cup of moka pot coffee is to control the heat source.
If the heat is too aggressive, the pressure will force ground coffee through into the top chamber.
Lower the heat and remove the moka pot from the heat source the moment you hear it start to gurgle. The moment you hear it gurgle, rinse the base of the moka pot under the cold tap to stop the brewing process.
Another tip is not to pour the coffee from the moka pot straight away after brewing. Let the moka pot to stand for one to two minutes to allow any fine grounds to fall to the bottom. Provided you pour gently, the sediment will stay in the moka pot.
AeroPress filter hack
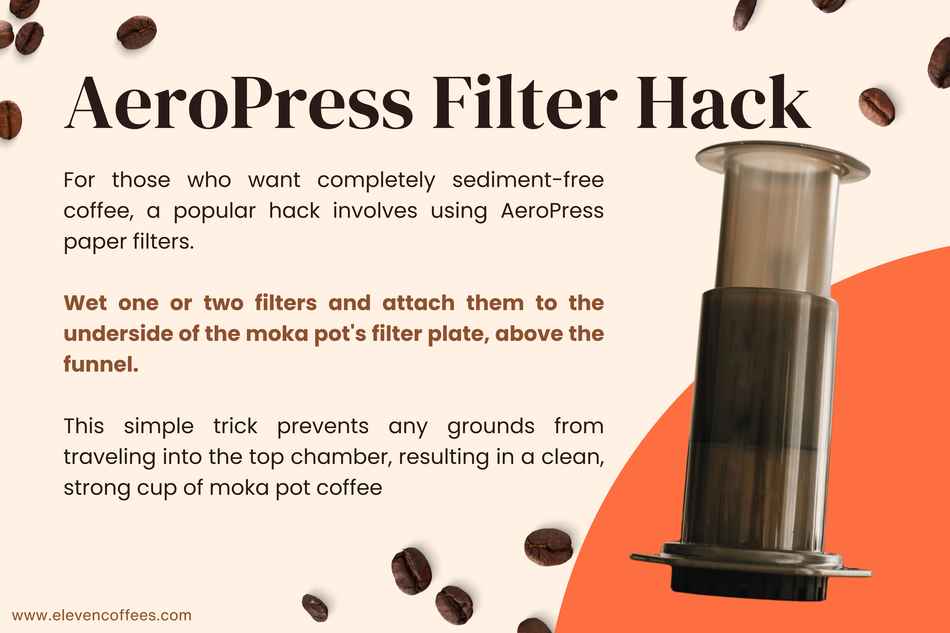
For those that really can’t stand any amount of sediment in their coffee, there is a hack that’s becoming more and more popular.
If you own an AeroPress coffee maker, you’ll have the small circular paper filters that accompany the brewer. Wet one or two filters, and stick them to the underside of the filter plate (above the funnel).
This prevents any grinds travelling up into the top, resulting in a lovely, clean cup of moka pot coffee that’s still knock-your-socks-off strong.
For more on the correct moka pot technique, check out this video by James Hoffmann of Square Mile coffee roasters in the UK.
French press
You might be surprised to see the inclusion of the French press here on this list as having a certain level of sediment in the cup is part and parcel of this coffee maker.
However, there is a way to greatly reduce the sediment levels with a few simple tricks. Also, one French press in particular has a superior filtration system that eliminates much of the ground coffee sediment.
Stirring
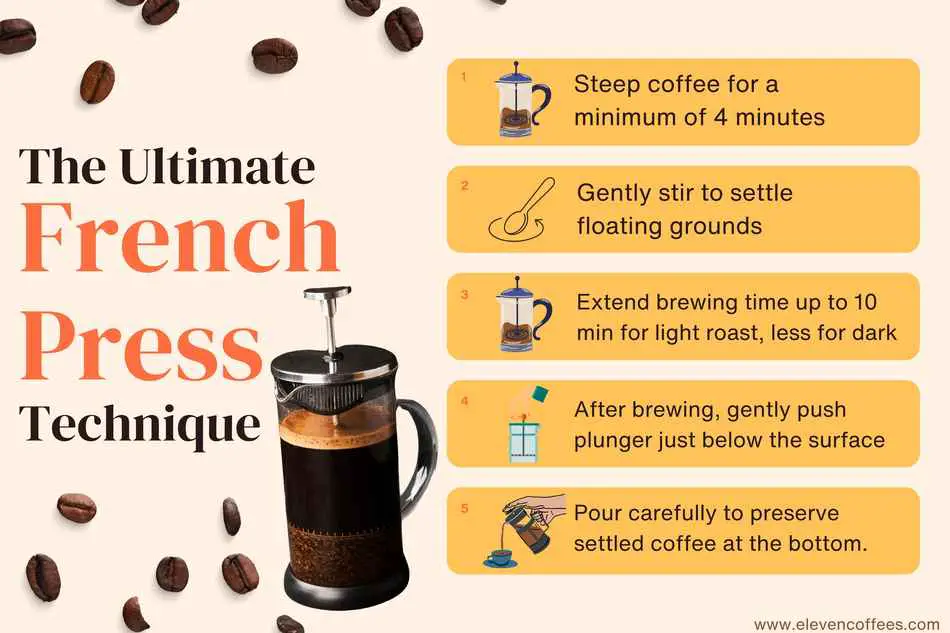
French press coffee should be allowed to steep for a minimum of four minutes, at which point you should give the floating grounds a gentle stir.
This causes the grounds on the surface to fall and settle at the bottom of the brewer. Depending on the roast level of your coffee, you can let the coffee brew for up to a further 10 minutes (less time for dark roast, longer for light).
The extra time allows for the coffee to sink to the bottom and also creates a more even extraction with a greater depth of flavour.
Plunging
Once the coffee has had time to settle and brew completely, next comes the plunge. Whilst the intended method is to fully depress the plunger to the bottom of the brewer, this causes an issue that you’ve worked hard to overcome.
By plunging to the bottom, the pressure whips up the coffee grounds, causing them to bypass the mesh filter.
In order to avoid this problem, push the plunger gently to just below the surface of the coffee. Now pour in a gentle manner so as not to disrupt the coffee that has settled at the bottom, and you should find yourself with a cup of French press coffee that is pretty much sediment-free.
If you’d like to see this being done, and for a few extra French press making tips, have a watch of this great video.
How a better quality French press reduces the risk of sediment
If you want to enjoy French press coffee that’s sediment-free, you’ll want to buy the king of French presses: the Espro press.
Most French presses have only one mesh filter held in place by a metal plate. The result is less than satisfactory filtration as the metal plate doesn’t create a tight seal against the carafe walls, allowing a lot of grounds to bypass.
Another issue with standard French presses is that the mesh filter becomes misshapen over time, which again results in more and more grinds finding their way into your cup.
Espro’s sediment-free filtration
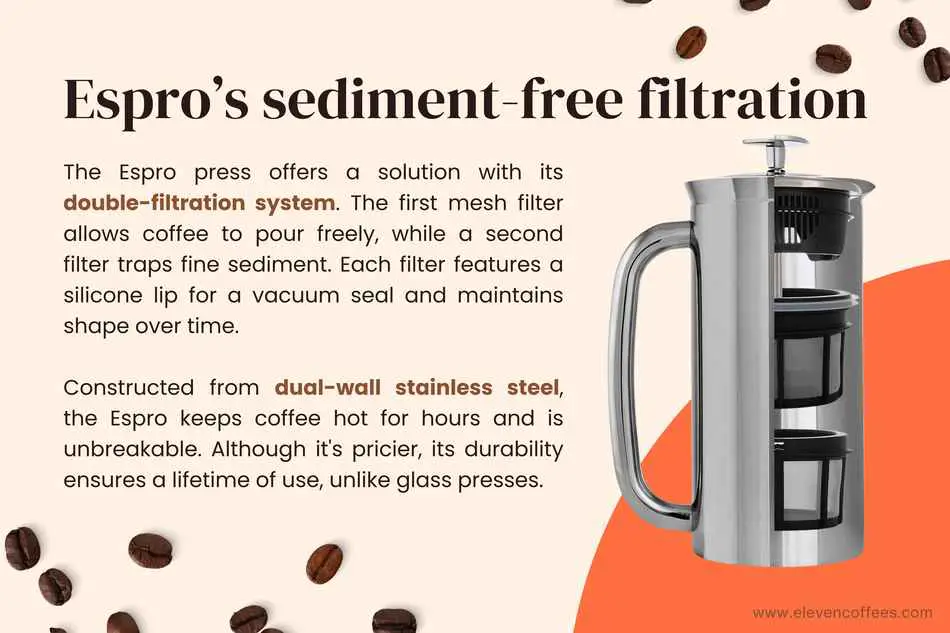
The solution to this problem is with the Espro press and its double-filtration system. The first mesh filter has slightly larger holes to allow the coffee to pour freely and a second filter with smaller holes to trap the fine coffee ground sediment.
To further increase the efficacy of the two filters, each has a silicone lip that runs around the rim to create a vacuum seal. The design of the filter also means that it will not become misshapen through extended usage.
The Espro has other benefits such as being made from dual-wall stainless steel, which is unbreakable and keeps the coffee hot for hours.
The Espro is at the higher end in terms of price points, but the great thing is that it’ll last you a lifetime as, unlike glass French presses, stainless steel doesn’t break. I’ve vowed never again to buy glass.
If you’re looking for something cheaper, make sure to check out the unbreakable plastic Bodum French press on Amazon with its upgraded filter.
Alternatively, you can read my full review of the unbreakable plastic Bodum, and discover why I think it’s a better choice than glass.
Why your coffee grinder might be causing the problem
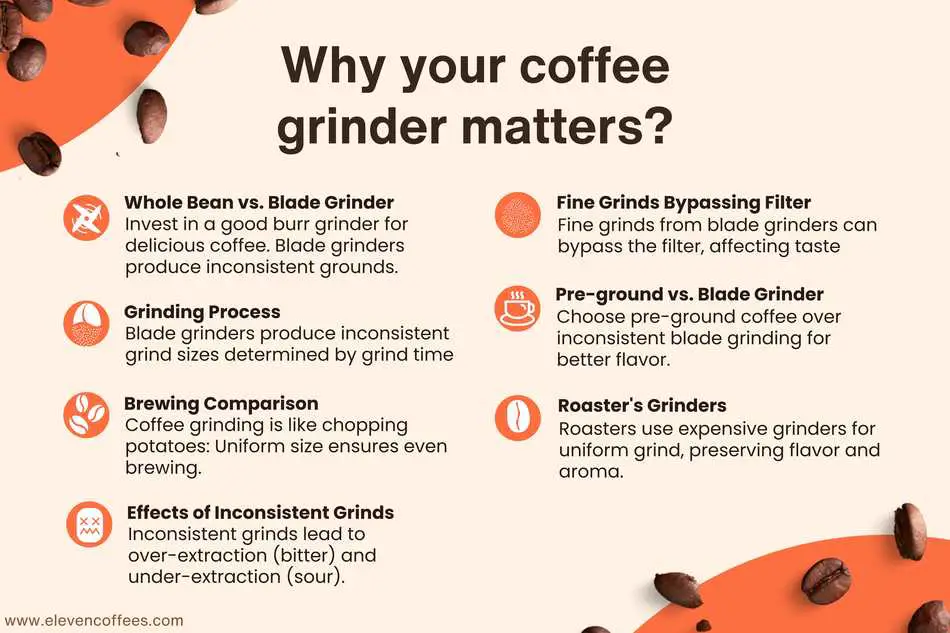
Lastly, a note on coffee grinders. In order to achieve delicious-tasting coffee, you really need to invest in a good burr grinder. My favourite entry-level grinder for home use is the Baratza Encore.
To save a few pennies, many make use of blade grinders. These cheap blade grinders can cause a whole lot of ground coffee sediment to end up in your cup. Pwah.
Whilst it’s great that you’re buying whole bean coffee instead of ground, you could actually improve the quality of your coffee by skipping the blade grinding altogether.
The goal of grinding coffee is to have grounds that are as uniform in size as possible and that are the appropriate size for your coffee maker.
The issue with blade grinders is that the grind size is only determined by the length of time that you hold the power button, and this is an issue for two reasons:
- You can’t choose the size of grind that you need.
- The blades produce a mixture of fine and coarse grounds.
Brewing coffee can be compared to boiling potatoes. Yes, really. When you chop up a potato for boiling, the goal is to have each piece the same size so that all the pieces take the same amount of time to cook.
Coffee is no different
When you have a mixture of fine and coarse grounds, the fine grounds get “over-cookedâ€, causing a bitter taste, and the coarse grounds are “under-cookedâ€, causing a sour taste.
What’s more, the very fine coffee grinds from your blade grinder can easily end up in your cup as they’re able to bypass the filter.
Given the choice between buying pre-ground coffee or grinding whole bean in a blade grinder, I would go with pre-ground every time.
The coffee roasters that grind the coffee use very expensive grinders that produce a very uniform grind, and I’ll take the loss of flavour and aroma over a cup that is a mix of sour and bitter any day.
The good news is that you can enjoy freshly ground whole bean coffee using excellent-quality burr grinders for as little as $35 (£25).
Check out this post that goes into greater detail on blade vs burr grinders, with my recommendations on the top entry-level burr grinders on the market.
I’ve also put together a list of some of the best and most affordable burr grinders as part of my recommended products page.